Pillows made from Quilt Blocks

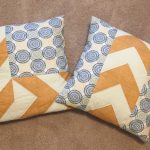
These pillows were made from a pattern out of a Quilt Magazine.  But sometimes I make pillows out of extra quilt blocks from a quilt.  I used to buy Quilt Blocks of the Month from Joann’s when they went on clearance , but they don’t sell them anymore at my Joann’s. I like to sandwich them so that you can put a pillow form in and easily remove to wash the cover.  I measure the front block and cut two pieces of the back fabric the same size.  Then I fold the back pieces to about 1/3 the size so there is an overlap.  I sew the front to the back two pieces that are overlapped right sides together. 

Framed Newborn Cross Stitch

I like to do Cross-Stitch and have made a sampler for each of my grandkids when they were born.  This was a boughten kit that worked up quick and easily. I then framed it myself as I am a stickler for having the lines straight on cross-stitch pictures.  You can buy a matting that is sticky on one side so you can stick your picture to it and see how it looks in the frame.  I also like to have glass in the frame so it stays clean and neat.

Framed Wedding Cross Stitch Craft

I like to give personalized gifts for special occasions.  I bought this kit from a craft store, embroidered it with names and dates added to give as a wedding gift.  This one I had professionally framed as I wanted it done in a nice frame with double matting.  These pictures take awhile so don’t wait til the last minute to start them.  But they make a nice remembrance of a special occasion.

Homemade Hand-towels

I like to hang a towel over my stove handle which is next to my kitchen sink to use as a hand towel.  My mother used to crochet a top or make a top of fabric but the fabric never lasted as long as the towel and I don’t crochet.  I saw this idea at a craft show and have been making them ever since.  I like to use good quality towels and find them for all the holidays.  Then I go to the Dollar Store to buy pot holders to match them.  Then I cut the label off the pot holder and find the middle of the holder with the loop on the one side.  Then I lay the towel face down and fold it so the towel fits side to side of the pot holder.  I pin the middle of the towel and pin it to the middle of the pot holder right sides together.  Then I stitch across the middle of both. 

Refinished Dresser

We were given this dresser many years ago by a family member and it was a little dated almost a yellow color with gold hardware.  I have always wanted to change it up and finally decided a couple weekends ago to go ahead and paint it.  It ended up being way easier and looking nicer than I thought it would end up looking.  I chose a satin white interior paint, and started to prep the dresser.  First, I took all the hardware off so that I could spray paint them with an oil rubbed spray paint.  Then, I took all the drawers out and placed them with the good side up.  I placed a tarp under the dresser it self so that I wouldn’t get paint on my carpet.

Popsicle Stick Halloween Crafts

My kids love making things with popsicle sticks.  I wanted to harness their creativity and make something for a decoration we could use throughout the years.  We made these Frankenstein faces and Scarecrow faces by lining up some sticks however wide you want the face to be and then laying one across the top or back at an angle, and gluing it down to hold it all together.

Cheap Wall Decor for Little Boys Room

To make some cheap wall decor for my sons room- I bought a 3 Pack of canvas’ and painted them with spray paint.  I attached some pre-painted animals that you can find at any craft store in the wood crafts section.  (There are all sorts of pre-painted figures- Robots, Trucks, Princess, Ballerina, Fish etc. -so you could do this for any theme)  

Burlap Roman Shade Window Curtain

I made a lot of window curtains in my house, and for this bathroom I wanted to attempt to make a roman shade type curtain because it is an odd size.  I love burlap and it’s cheap so I chose that for my material.  I measured how wide the window is and added a couple inches so that when I made the hem on both sides it would line up.  I measured the length of the window too, but because I was going to have it rolled up I cut it out shorter.  I started with hemming all of the edges and at the top I folded it over and stitched about an inch or two from the top so that it would create the loop/slot to slide it on the curtain rod.

Refinished Trunk

I should have taken a before and after pic of this trunk, that each one of us used when we were little.  It was wrapped in a unicorn design with rainbows and clouds.  I wanted to refinish it to put in my daughters room when my mom had handed it down.  At first, I thought I could just paint over the unicorn design but almost instantly realized that it was like contact paper so when I painted  over it, it started to bubble and lift.