Wood Disc Snowflake Ornaments

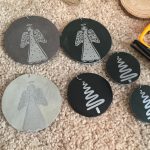
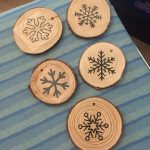
At the craft store I found these wooden discs that came in a big pack and they already had the hole at the top ready to be used as an ornament.  I found a variety of snowflake designs to make vinyl that would attach to them.  In this project I had used iron-on vinyl but if I did them again I would use a permanent vinyl as they didn’t stick that easily, and I’m not sure if they will long term.  

Outdoor Deck Privacy Wall

If you have a nosey neighbor and live in a neighborhood where houses are close together, and there really isn’t a way to block them out yet, this might be a good solution for you.  We recently planted some privacy plants along the fence to act as a taller privacy wall but we need to wait for that to fill in.  So in the mean time, we  decided to add a privacy wall on the deck itself.

Leather Coasters

Along with the leather ornaments I made, I also did some coasters.  My Dad’s cousin had made some larger circles that she had set aside for a project, and they were too big to turn into ornaments. I added our family name to the one set, and for the other set I added some cute drink sayings.  I used a permanent silver vinyl for this project.

Leather Ornaments

My Dad’s cousin used to work with leather and she had already cut out all of these circles and had set them aside for a project of hers, when I was given them I decided that I would make them into Ornaments.  This was a quick  and easy craft which involved making the vinyl decorations to be adhered to the leather.  I used a gold or silver permanent vinyl.

Stepping Stone

We have done a lot of gardening this year, and wanted to add some decorations from the kids as keepsakes.   We bought a kit for stepping stones at the craft store and decorated it with the stones that came with it, had them put their handprints on it and carved their name and year.  They look great in the garden and stand out with the colors.

Yearly School Picture Wall Decor

I wanted to make a wall decor for my kids school pictures to be displayed.  I found a thin piece of wood that I could stain and attach vinyl letters/numbers, and also have room to attach their photos.  I wanted it to look a little rustic so I attached a rope through the middle and spaced out clothes pins for each years picture.   Along the top, I attached the vinyl for their names and along the bottom I attached the vinyl for each K, 1, 2, 3, etc.